Topics

On this page

Last updated on Nov 12, 2025

GoDAM Developer SDK

The GoDAM Developer SDK allows developers to extend and customize the GoDAM video player using JavaScript. With a simple, well-structured API, you can create interactive video experiences, control playback, and dynamically insert custom layers, making your videos more engaging and data-driven.

Whether you’re building learning modules, gamified training, or marketing videos with interactive overlays, the SDK gives you direct access to player instances and their full functionality.

You can read the full documentation here. For an example implementation, continue reading below.

Overview

The GoDAM SDK provides access to the global JavaScript object window.GoDAMAPI, which exposes methods to:

With these tools, developers can integrate the GoDAM player seamlessly into any workflow or website.

Prerequisites

Before using the SDK, ensure that:

Getting Started

1. Create Your JavaScript File

Create a file such as developer-sdk-demo.js in your theme or plugin’s /js/ directory.

2. Enqueue the Script

Add this to your theme’s functions.php or plugin file:

functions.php

<?php
function enqueue_godam_sdk_demo() {
    wp_enqueue_script(
        'godam-sdk-demo',
        get_template_directory_uri() . '/js/developer-sdk-demo.js',
        array('jquery'),
        '1.0.0',
        true
    );
}
add_action('wp_enqueue_scripts', 'enqueue_godam_sdk_demo');

Implementation Guide

Step 1: Basic Setup

Start by ensuring the SDK is loaded and that at least one GoDAM player is available on the page.

developer-sdk-demo.js

(function() {
    'use strict';
    
    // Check if API is available
    if (typeof window.GoDAMAPI === 'undefined') {
        console.error('GoDAMAPI not found.');
        return;
    }
    
    // Get all players on the page
    const allPlayers = window.GoDAMAPI.getAllPlayers();
    if (allPlayers.length === 0) {
        console.error('No players found.');
        return;
    }
    
    // Access the first player (you can also access a player via ID)
    const player = allPlayers[0].player;
    let quizCompleted = false;
    
    // Your code will go here...
})();

Behavior:

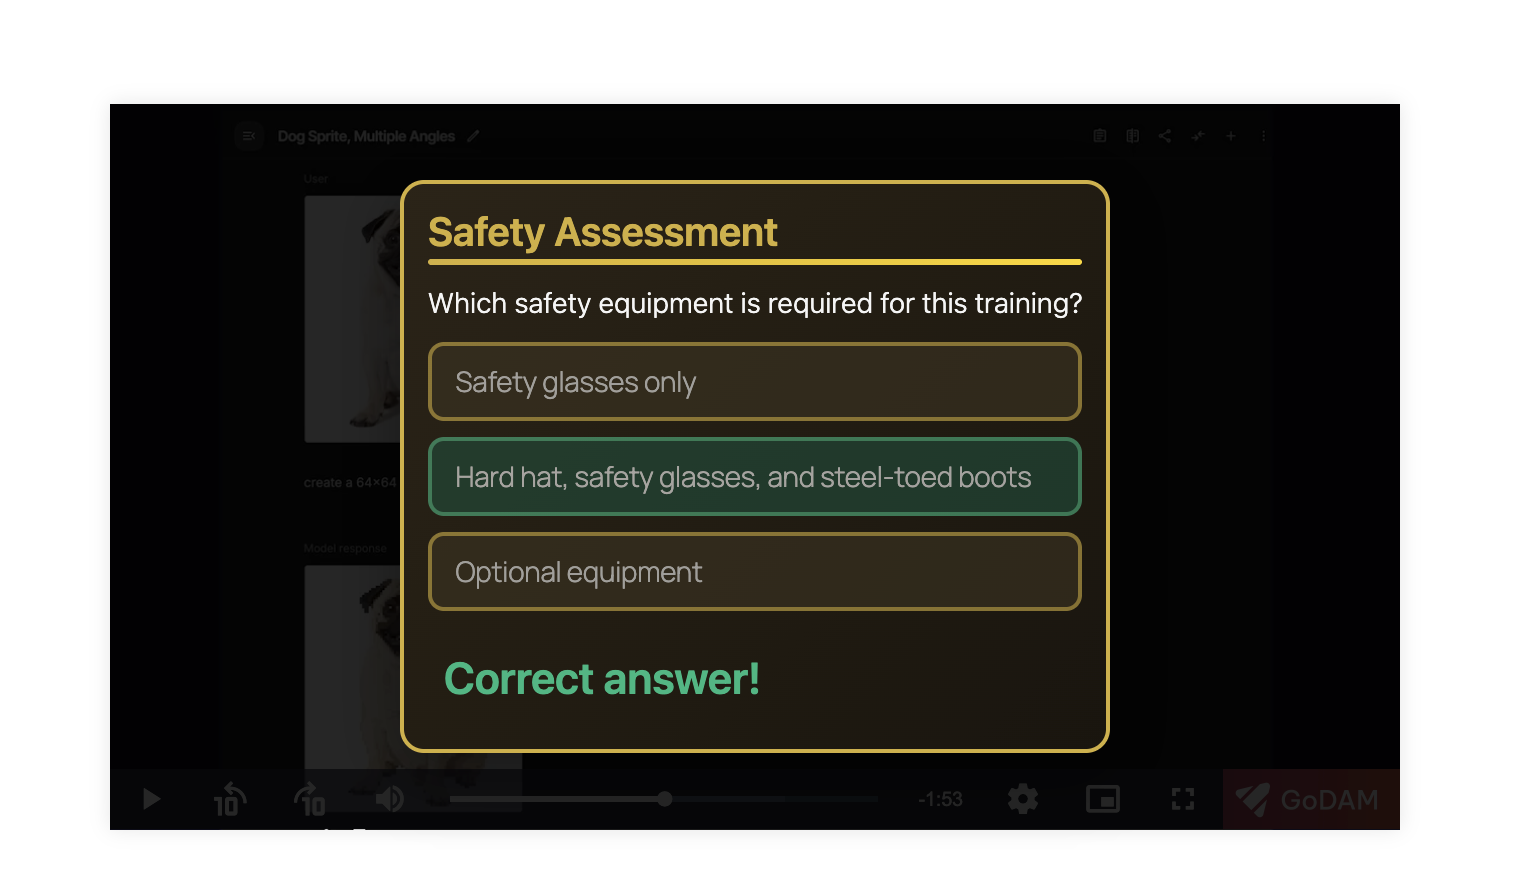
Step 2: Create Quiz Layer

Add this immediately after your setup code within the function.
This layer displays a multiple-choice question at 50% of the video progress and pauses playback while active.

developer-sdk-demo.js

const quizLayer = player.createLayer({
		html: `
			
				
					Safety Assessment</h2>
					</div>
				</div>
				Which safety equipment is required for this training?</p>
				
					
						Safety glasses only
					</button>
					
						Hard hat, safety glasses, and steel-toed boots
					</button>
					
						Optional equipment
					</button>
				</div>
				</div>
			</div>
		`,
		displayTime: '50%',
		backgroundColor: 'rgba(0, 0, 0, 0.85)',
		pauseOnShow: true,
		onShow: (el, p) => {
			const buttons = el.querySelectorAll('.quiz-btn');
			const feedback = el.querySelector('#quiz-feedback');
			
			buttons.forEach(btn => {
				btn.addEventListener('click', function() {
					if (quizCompleted) return;
					
					const isCorrect = this.dataset.correct === 'true';
					
					// Disable all buttons
					buttons.forEach(b => {
						b.style.pointerEvents = 'none';
						b.style.opacity = '0.6';
					});
					
					// Show feedback with animation
					if (isCorrect) {
						this.style.border = '2px solid #10b981';
						this.style.background = '#064e3b';
						this.style.color = '#ffffff';
						feedback.innerHTML = 'Correct answer!</div>';
						
						quizCompleted = true;
						localStorage.setItem('godam_quiz_result', 'correct');
						setTimeout(() => { el.dismiss(); p.play(); }, 2000);
					} else {
						this.style.border = '2px solid #ef4444';
						this.style.background = '#7f1d1d';
						this.style.color = '#ffffff';
						feedback.innerHTML = 'Incorrect. Please try again.</div>';
						
						// Re-enable buttons after 2 seconds
						setTimeout(() => {
							feedback.innerHTML = '';
							buttons.forEach(b => {
								b.style.pointerEvents = 'auto';
								b.style.opacity = '1';
								if (b !== this) {
									b.style.border = '2px solid #d4af37';
									b.style.background = '#3d3220';
									b.style.color = '#f5f5f5';
								}
							});
							this.style.border = '2px solid #d4af37';
							this.style.background = '#3d3220';
							this.style.color = '#f5f5f5';
						}, 2000);
					}
				});
				
				// Hover effects
				btn.addEventListener('mouseenter', function() {
					if (!quizCompleted) {
						this.style.background = '#4a3d28';
						this.style.borderColor = '#ffd700';
					}
				});
				btn.addEventListener('mouseleave', function() {
					if (!quizCompleted) {
						this.style.background = '#3d3220';
						this.style.borderColor = '#d4af37';
					}
				});
			});
		}
});

Key Properties:

Output:

Quiz Layer Example

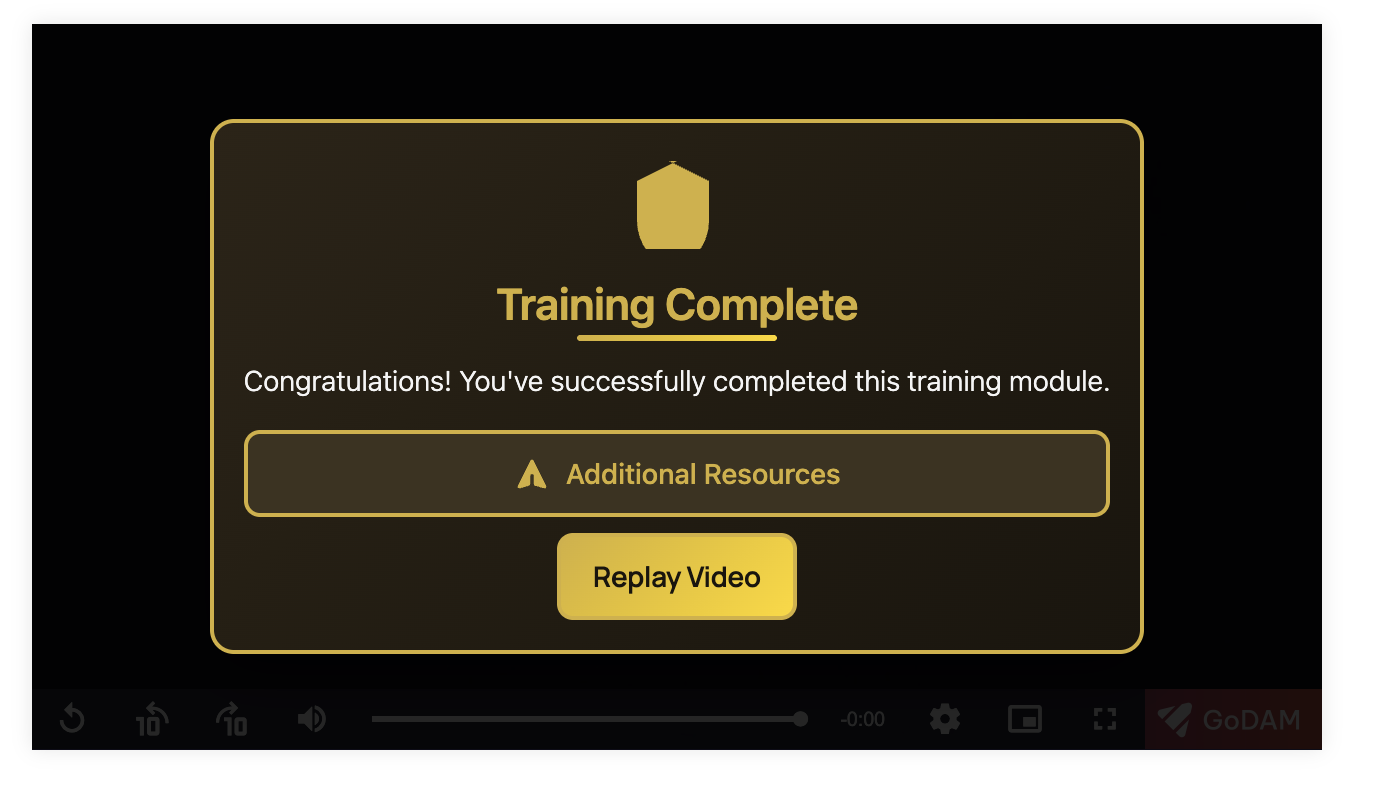
Step 3: Create End Screen

Add this code after your quiz layer to show an interactive end screen at 100% playback.
It includes a message, a resource link, and a replay button.

developer-sdk-demo.js

const endScreen = player.createLayer({
		html: `
			<div class="end-container" style="padding:15px;max-width:600px;margin:20px auto;font-family:-apple-system,BlinkMacSystemFont,'Segoe UI',Roboto,'Helvetica Neue',Arial,sans-serif;background:linear-gradient(135deg,#2c2416 0%,#1a150d 100%);border:2px solid #d4af37;border-radius:12px;box-shadow:0 8px 32px rgba(0,0,0,0.4);text-align:center;max-height:80vh;overflow-y:auto;">
				<div style="margin-bottom:15px;">
					<svg width="48" height="48" viewBox="0 0 24 24" fill="#d4af37" style="margin-bottom:8px;">
						<path d="M12 2L2 7v10c0 5.55 3.84 10.74 9 12 5.16-1.26 9-6.45 9-12V7l-10-5z"/>
						<path d="M9 12l2 2 4-4"/>
					</svg>
					<h2 style="margin:0 0 3px 0;color:#d4af37;font-size:22px;font-weight:600;">Training Complete</h2>
					<div style="height:3px;background:linear-gradient(90deg,#d4af37 0%,#ffd700 100%);border-radius:2px;margin:0 auto 10px;max-width:100px;"></div>
					<p style="margin:0;color:#f5f5f5;font-size:14px;">Congratulations! You've successfully completed this training module.</p>
				</div>
				
				<div style="display:flex;flex-direction:column;gap:8px;margin-top:15px;">
					<a href="https://example.com/resources" target="_blank" class="resource-link" style="padding:10px 16px;border:2px solid #d4af37;background:#3d3220;color:#d4af37;text-decoration:none;border-radius:8px;font-weight:500;transition:all 0.3s ease;display:flex;align-items:center;justify-content:center;gap:8px;font-size:14px;">
						<svg width="18" height="18" viewBox="0 0 20 20" fill="currentColor">
							<path d="M10.894 2.553a1 1 0 00-1.788 0l-7 14a1 1 0 001.169 1.409l5-1.429A1 1 0 009 15.571V11a1 1 0 112 0v4.571a1 1 0 00.725.962l5 1.428a1 1 0 001.17-1.408l-7-14z"/>
						</svg>
						Additional Resources
					</a>
					<button id="replay-btn" style="padding:10px 16px;border:2px solid #d4af37;background:linear-gradient(135deg,#d4af37 0%,#ffd700 100%);color:#1a150d;cursor:pointer;border-radius:8px;font-weight:600;font-size:14px;transition:all 0.3s ease;display:flex;align-items:center;justify-content:center;gap:8px;margin:0 auto;">
						Replay Video
					</button>
				</div>
			</div>
		`,
		displayTime: '100%',
		backgroundColor: 'rgba(0, 0, 0, 0.85)',
		pauseOnShow: true,
		onShow: (el, p) => {
			const resourceLink = el.querySelector('.resource-link');
			const replayBtn = el.querySelector('#replay-btn');
			
			// Hover effects for resource link
			resourceLink.addEventListener('mouseenter', function() {
				this.style.background = '#4a3d28';
				this.style.borderColor = '#ffd700';
				this.style.color = '#ffd700';
			});
			resourceLink.addEventListener('mouseleave', function() {
				this.style.background = '#3d3220';
				this.style.borderColor = '#d4af37';
				this.style.color = '#d4af37';
			});
			
			// Replay button
			replayBtn.addEventListener('click', () => {
				el.dismiss();
				p.seek(0);
				p.play();
			});
			
			replayBtn.addEventListener('mouseenter', function() {
				this.style.transform = 'scale(1.02)';
				this.style.boxShadow = '0 4px 16px rgba(212, 175, 55, 0.4)';
			});
			replayBtn.addEventListener('mouseleave', function() {
				this.style.transform = 'scale(1)';
				this.style.boxShadow = 'none';
			});
		}
	});

Key Properties:

Output:

End Layer Example

Code Breakdown

Both layers follow the same API pattern:

Function / PropertyDescription
player.createLayer(options)Creates a new layer overlay.
displayTimeTime (in % or seconds) when the layer appears.
pauseOnShowPauses video when the layer is displayed.
onShow(el, p)Callback that fires when the layer becomes visible.
el.dismiss()Removes the layer overlay.
p.play()Resumes video playback.
p.seek(0)Rewinds the player to the beginning.

The GoDAM Developer API enables developers to deeply customise and extend the GoDAM video player using JavaScript. Through the global window.GoDAMAPI object, you can retrieve player instances, control playback, create interactive layers (such as quizzes, polls or end-screens), and bind custom logic to player events. This powerful interface allows you to transform standard video playback into rich, engaging experiences that align with your branding and business workflows.

For full technical details of the API, see the GitHub README: GoDAM Player API.